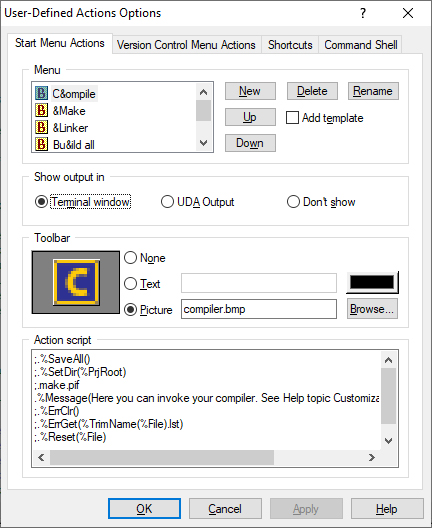
User-Defined Actions Options

Displays the User-Defined Actions dialog box. It is divided into four tabs:

Start Menu Actions

Version Control Actions

Shortcuts

Command Shell

User-Defined Actions Macros

One User-Defined Action consists of one or more executable lines with external programs and macro-substitutions (beginning with "." or "+").

An executable line will not be executed before the previous one has been executed (exception: a previous line beginning with "+"), and can be executed several times if so defined using certain specific macro-substitutions. The macro-substitution begins with the "%" character, followed by macro-name and parameters enclosed by brackets (case insensitive). A macro-substitution that could not be recognized will be copied to the resulting string. White space characters are copied in the original form. Lines which begin with the "-" character are used as separators, and will appear as horizontal lines in the submenu. The characters "%", ",", and ")" can be inserted in the resulting string using the "%" character: "%%,", "%," and "%)". If there is a need to append characters at the end of the macro-substitution, "()" must be inserted: %PrjRoot()ABC.

Lines beginning with semicolon ( ; ) are considered comment lines.

In order to execute an internal DOS command the string of the following form should be used:

COMMAND.COM /C <internal command> <parameters>

PIF files for DOS applications can be created. These files determine the conditions under which the applications will be executed. The description of PIF files can be found in Windows or PIF Editor documentation.

Macros which have an argument for a file name use the folder set by the %SetDir macro, or Options > Project / Project Root Directory as a default path.

Example for Compiler, Linker and Make utility User-Defined Actions:

[Action.Start]
&Compile !@compiler.bmp
.%if( %HasModuleExt( %CurrFile ),,%Message( Not a module file! )  %Cancel )
.%if( %CurrEdit,%Update( %CurrEdit ), )
.c:\comp\prog\comp.exe %CurrFile
.%ErrClr()
.%ErrGet( %Name( %CurrFile ).lst )
.%Reset( %CurrFile )
&Linker !@linker.bmp
+c:\comp\prog\linker.exe
&Make !@make.bmp
+c:\comp\prog\make.exe

Start Menu Actions

User-Defined Actions Options Start Menu Actions tab

In "Menu" commands list, inserting "&" in front of a character within the name defines an access key. To add a separator, put "---" for Action name on the menu.

New

Creates new actions and separators.

Delete

Deletes the selected action or separator.

Rename

Changes the name of the selected action.

Up

Moves selected action up.

Down

Moves selected action down.

Add template

Specifies whether or not particular actions were taken from the User-Defined Action template that comes with DA-C.

Show output in

Terminal window: Opens Terminal window for output

User-Defined Actions Output: Redirects output to User-Defined Actions Output tab.

Redirects output to User-Defined Actions Output tab.

Don't show: Ignores output for action

Toolbar

Displays the toolbar button corresponding to the selected action.

NNone, Text, Picture

Enables you to choose whether text, buttons or nothing will be displayed on the toolbar. If you select "Picture", note that the best results will be obtained using 20*20 pixel bitmaps drawn in the default 16 color palette. The default folder for BMP's is called BITMAP, and is located either in the same folder as the PROGRAM folder, or in the project root directory. Should you choose "Picture", icons built into a suitable program called by means of UDA can also be used as pictures (icons are built into .exe or .dll, all you have to do is to point at .exe or .dll).

Browse

Enables you to select the bitmap that will appear on the toolbar button for the selected User-Defined Action.

Action Script

One or more executable lines with external programs and macro-substitutions

Version Control Menu Actions

User-Defined Actions Options Version Control System Menu Actions tab

See description in "Start Menu Actions".

Shortcuts

User-Defined Actions Options Shortcuts tab

Press new shortcut key

Select the action you want from the list of actions, click in the "Press new shortcut key" box, and press the key combination you want. Then click Assign, to confirm your choice of shortcut, and repeat the process for the other actions. To cancel a shortcut key, select the action you want, enter the Backspace key into the "Press new shortcut key" box, then click Assign.

The shortcut keys defined in this dialog box are of a higher priority than all other shortcut keys in DA-C.

Execute after file open

When checked. this action is executed whenever a file is opened. It is useful for synchronization with external editors.

Command Shell

User-Defined Actions Options Command Shell tab

Text Width

Number of characters per line.

Max number of lines shown

Number of rows that are displayed in the Command Shell and User-Defined Actions Output tabs.