Source Editor
Overview
Editor Keyboard
Key Names
Full Command Insertion
Block Commands
Search and Replace
Hiding Lines
Conditional Coloring and Hiding
Structure Highlighting
Coding Convention Checking
Start Other Applications from the Editor
Source Formatter
Overview
The DA-C Editor with built-in Flowchart allows parallel editing and examination of the logical structure and usefulness of the comments in the source. Generating structured and unstructured flow diagrams directly from the code (on the fly) makes it possible to form and document module or function structure prior to coding, as well as to review it with colleagues from the hardware or mechanical departments.
Each Editor has a unique name, and can contain an arbitrary file. If the loaded file is one of the project files, the name of the window will be identical to the name of the file relative to Project Root directory. Otherwise, it will be the full path name of the file. If the window was opened using the File > New command, its name is not known, and the name of the window will be in the form of "Untitled-n", where "n" is a unique number. When saving this file, you will be asked to rename it.
If the loaded file is marked as read-only, Editor will open a window using a special mode which allows the execution of non-destructive operations on the contents of the window only. The changed caret and the "read-only" sign on the status bar symbolize this regime. Editor provides a possibility for alarming you when such a file has been loaded; it can be enabled through the Options > Editor / General / Start > Read-only notify check box. An additional difference between read-only and other open files is that windows of read-only files have different background color. This color can be set in Options > Editor / C Source / Colors & Font / Elements / Read-only background.
The size of an Editor can be predetermined using Window Width and Window Height in the Options > Editor / General dialog box.
Editor can be spitted into two horizontal panes, allowing simultaneous editing of different parts of the same document, and this option toggles splitting of the active Editor. Initially, panes are displayed in equal size (50:50 proportion), but you can manually shrink or grow window panes by mouse dragging the pane splitter.
You can activate the shortcut menu, which provides easier access to various often-used commands, by right-clicking any C symbol in an Editor. Right-clicking outside the C symbols produces a list of functions implemented in the current source module. The order of the listed functions is determined by the Sort Functions options of the Options > Browser dialog boxes. Clicking on any item in the list positions the insertion point at the beginning of that function in the source.
If you double-click "
#include", Editor opens a new window with the corresponding header file loaded. With right-click on "#include" or file name you may also open include file.
Editor Keyboard
DA-C provides a few predefined keyboard layouts which can be selected using the Options > Editor / Keyboard dialog box:
All these keyboard layouts (see Appendix A) include the Full Command Insertion feature, which permits frequently used C statements to be entered with just a few keystrokes.
A possibility of keyboard mapping permits the defining of special key function arrangements in Editor. The most efficient method is to define a custom keyboard layout.
General and Browser key functions cannot be redefined, but may be overridden by an Editor mapping. To change the keyboard layout you are using, edit and recompile its .EML file with the Editor Macro Compiler. The easiest way to do this with a currently active layout is to execute the File > Configuration Files > Keyboard Definition File and Start > Compile Keyboard Definition File commands. A possible alternative is to load new definitions in DA-C Editor by reselecting the keyboard layout in the Options > Editor / Keyboard dialog box.
Editor supports adjustment to natural languages:
Automatic character expansion (for example, the German characters ß, ä, ö, ü, Ä, Ö and Ü can be converted automatically into ss, ae, oe, ue, Ae, Oe and Ue) is implemented by means of the Editor Macro Language.
Source code developed using previous DOS editors contains DOS ANSI characters (for example, ß, ä, ö, ü, Ä, Ö and Ü). As the Windows ANSI set uses different codes for these characters, without conversion, Editor would display incorrect characters on those places. If DOS to Windows conversion were carried out, version control would find a "difference" in relation to earlier unconverted versions at these positions/places. For the above reasons, the conversion of these characters on reading, in one direction, and on saving, in the opposite, is a suitable compromise for files containing DOS characters of a particular natural language. See Options > Editor / Keyboard / DOS-Windows conversion.
Key Names
Shortcut keys can be defined using predefined key names, modified by Ctrl, Alt, AltGr and Shift:
Backspace
NumPad4
TAB
NumPad5
Enter
NumPad6
Escape
NumPad7
Space
NumPad8
PageUp
NumPad9
PageDown
Multiply (numeric pad '*)
End
Add (numeric pad '+)
Home
Subtract (numeric pad '-')
Left
Decimal (numeric pad '.')
Up
Divide (numeric pad '/')
Right
F1 to F12
Down
;
Insert
=
Delete
,
0 to 9
-
a to z
.
A to Z and ßäÄöÖüÜ
Slash
NumPad0
`
NumPad1
[
NumPad2
Backslash
NumPad3
]
Key names and modifier names are case sensitive. The only exception to this are the letter keys (a-z and A-Z). For example, "Ctrl + a" and "Ctrl + A" both mean pressing the "Ctrl" and "A" keys simultaneously (without pressing "Shift").
Editor supports the following manners of defining shortcut keys:
1. The combination consists of pressing a single key:
<Backspace> means pressing the Backspace key once.
This combination will be marked "Backspace".
2. The combination consists of simultaneously pressing two keys:
<Ctrl P> means pressing the "Ctrl" and "P" keys simultaneously.
This combination will be marked "Ctrl + P".
3. The combination consists of simultaneously pressing three keys:
<Ctrl Shift A> means pressing the "Ctrl", "Shift", and "A" keys simultaneously.
This combination will be marked "Ctrl + Shift + A".
4. The combination consists of two consecutive different combinations, forms 1, 2, or 3:
<Ctrl Q> <Ctrl K> means pressing the combinations Ctrl+Q and Ctrl+K consecutively.
This combination will be marked "Ctrl + Q, Ctrl + K".
<Ctrl Shift K> <1> means pressing the combinations Ctrl+Shift+K consecutively, and then pressing "1".
This combination will be marked "Ctrl + Shift + K, 1".
Full Command Insertion
DA-C Editor makes a C programmer's life easier with a feature called Full Command Insertion (a variant of template editing). Frequently used C statements, with all the necessary brackets, can be inserted with just a few keystrokes. This feature is implemented through the keyboard definition files provided with DA-C. You can modify these files to change key assignments or command insertion templates. The assignment can be different for each type of keyboard layout. The current key assignment for Full Command Insertion is:
Shortcut key Action
<Shift Ctrl A>
asm<Shift Ctrl B>
break;<Shift Ctrl C>
case : ; break;<Shift Ctrl D>
do

        {

        }

        while(  )
<Shift Ctrl E>
else<Shift Ctrl F>
		for ( ; ; )

        {

        }
<Shift Ctrl G>
goto ;<Shift Ctrl I>
		if ( ) /* */

        {

        }
<Shift Ctrl L>
long<Shift Ctrl R>
register<Shift Ctrl S>
		switch(  )

        {

        case :

		break;

        }
<Shift Ctrl T>
typedef<Shift Ctrl U>
		union

        {

        };
<Shift Ctrl V>
void<Shift Ctrl W>
		while(  )

        {

        }
To change the contents of insertion templates or the key assignment you must edit the .EML file that matches the keyboard layout you are using. To enable DA-C Editor to see the changes, you must recompile the changed .EML file with the Editor Macro Compiler. The easiest way to do this with a currently active layout is to execute the File > Configuration Files > Edit Keyboard Definition File and Start > Compile Keyboard Definition File commands. An alternative is to load of new definitions into DA-C Editor by reselecting the keyboard layout in the Options > Editor / Keyboard dialog box.
Block Commands
Text can be selected in different ways depending on the chosen keyboard layout. Brief keyboard emulation provides key combinations for four types of block selection: inclusive, non-inclusive, line and column. The inclusive selection includes the character on which the insertion point is positioned, unlike the non-inclusive one. The line marking selection includes the whole line in which the insertion point is positioned, while the column marking selection selects text vertically. Classic Borland keyboard emulation and Default DA-C keyboard also provide different markings, but in these layouts special key combinations are used to set the inclusive, non-inclusive, line and column marking mode. The chosen marking mode will be applied when selecting blocks.
There are two ways to select a block using the mouse. The first one is the standard Windows system: click and drag. The second one uses multiple clicks of the left mouse button to select text elements in an Editor. First click positions the insertion point at the mouse pointer position. The second one selects the word on which the insertion point is positioned (if there is no word, Editor will try to select the whole line). The third one selects the whole line in which the insertion point has been positioned (if the line is empty, Editor will try to select the structure or statement block), and the fourth click selects the structure block in which the insertion point has been positioned.
Positioning the insertion point at the beginning or the end of the block and using the standard selecting functions can expand the previously selected block.
Selected blocks can be made permanently or non-permanently defined in Options / Editor / General / Persistent Blocks.
Search and Replace
A search operation begins by setting the search options using the Search / Find or Search / Replace dialog boxes.
The search string can be entered in various ways. If no text has been selected, the Search dialog box will offer the word on which the insertion point is positioned. If not more than one line has been selected, the search string will be equal to the selected text. Otherwise, the search string will be the word on which the insertion point is positioned. The maximum size of the search string is 128 characters.
After the first instance of the string has been found, the search operation can be resumed using the Search / Next and Search / Previous commands. The first one continues searching in the specified search direction, while the second one searches in the direction opposite to the specified one. You can select another search string, with the rest of the dialog box settings remaining the same as in the previous search.
You can use regular expressions by clicking the appropriate check box. Expressions may contain the following:
Character Explanation
^ Start of line.
$ End of line.
. Any character.
* Any number of occurrences of the previous characters, including none.
+ At least one occurrence of the previous characters.
? Zero or one occurrence of the previous characters.
[ ] One of the characters that appear in the brackets.
[-] Character in the range of characters, for example [a-z].
[^] None of the characters that appear in the brackets.
Escape characters:
\^ means character "^" and not the beginning of the line;
\f means form feed;
\b means backspace;
\t means a TAB character is expected;
\040 and \x20 are replacements for a white space.
Hiding Lines
The editor provides a way of hiding selected text in an Editor. This operation can be performed using the Edit > Hide command. The selected text is replaced with a rectangle containing text defined by Options > Editor / C Source / Hide Prefix. This text can be altered like any other text in an Editor (with some exceptions), so you can describe the hidden text in some detail. Hiding of the text is a recursive operation, so text already hidden can be hidden again, (max. 255 levels). The hidden text can be unhidden by double-clicking over the rectangle describing it. Saving the contents of the file will not reveal the hidden blocks, but the actual contents will be saved.
Copying the hidden text to Clipboard will not save the hidden status of the copied text. If there is a need to jump to any hidden line, you will be asked for confirmation before the block is unhidden.
Conditional Coloring and Hiding
Developers use preprocessor
#if,#ifdefand#ifndefdirectives to make a code more general that is more configurable and usable in a number of different variants. At any given moment, a developer operates with code variant for precisely defined values of preprocessor symbols.In such situations a part of the code, intended for other variants, is inactive it is not compiled. This part of the code, although very necessary, enlarges the code and reduces its readability.
C source analysis, among other things, helps you treat the code conditionally excluded from the analysis by preprocessor directives in a special way. Editor has a built-in option for coloring of unanalyzed lines (Syntax Coloring) as well as for the automatic or semi-automatic hiding of unanalyzed lines.
The mechanism for hiding unanalyzed lines does not differ from the usual DA-C hiding of lines (see Hiding). The only difference is that here it is done on the basis of information received from C source analysis. Automatic hiding of unanalyzed lines is active if the option Options > Editor / C source / Hide Unanalyzed Lines is active. In this mode, when opening a file and after the code analysis has been executed, all unanalyzed parts of the code are hidden. In this way, it is possible to view and correct only the analyzed active code.
Unanalyzed parts of a code can be also hidden explicitly by the following commands:
Edit > Preprocessor / Hide All Unanalyzed Lines - which hides all unanalyzed parts of file code,
or
Edit > Preprocessor / Hide This - which hides the unanalyzed part of the code in which the insertion point is currently positioned.
Naturally, each individual hidden part of the code can be made visible by the Edit > Unhide command or by double-clicking the hidden part. All unanalyzed parts of the code can be made visible by the Edit > Preprocessor / Unhide All Unanalyzed menu command.
Commands for hiding/unhidding the unanalyzed parts of the code also available via the keyboard macro:
HideThisPreprocessorBlock()
HideAllUnanalyzedBlocks()
UnhideAllUnanalyzedBlocks()
BlockUnhide()You can use the following keyboard shortcut to hide/unhide the unanalyzed parts of the code:
< Ctrl K >< H > - mToggleHideBlock
It should be stressed that since the information on the coloring and hiding of the unanalyzed code is obtained from the static code analysis, should the preprocessor directives themselves be changed (which admittedly does not happen too often), the project database should be updated so that the coloring and hiding of unanalyzed lines is done on the basis of current information.
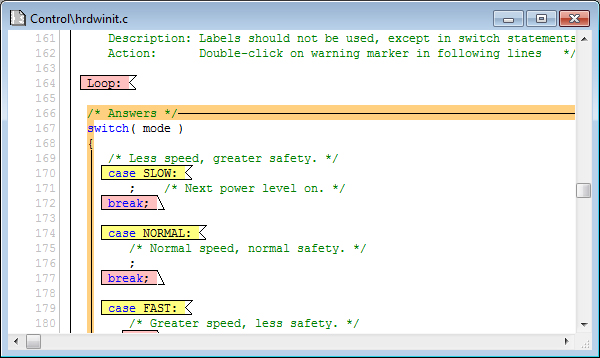
Structure Highlighting
Editor also offers a very interesting way of emphasizing C source program structure. Not only syntax coloring, but also a type of display with emphasized function flow control. This type of display is called simply Structure Highlighting. Borders and background colors have been provided to emphasize function flow control. The rest of the text lists and illustrates by way of examples the various possibilities the Structure Highlighting display offers. You can choose to emphasize the structure block (function, while, for, switch, and so on) by means of a colored border and/or a line border. Background color can serve to emphasize the structure block body regardless of whether or not a border has been provided. Background color can be used so as to rectangularly encompass the entire block or just space under the text making up the block. Some of the effects of this type of highlighting are illustrated on the following figures:
Background: Text - only option selected
Background: Full option selected
In order to emphasize non-structured jumps (break, continue, label, return, goto) some of the following graphical shapes can be displayed next to or around them. The figure illustrates the possibilities Structure Highlighting offers you when it is necessary to emphasize the non-structured code which may appear in the C code together with the line borders.
Unstructured: Beside (left) and Around (right)
Graphic shapes
The Structure Highlighting type of display is activated (deactivated) by selecting the View > Structure Highlighting, by means of the key combination Alt+V+H, or by pressing the Structure Highlighting button on the toolbar. Once selected, Structure Highlighting can be used on an individual project function. Its effect ceases with the beginning of code editing. To be displayed again, Structure Highlighting must be explicitly activated once more. You can select the function on which this type of display is to be applied from the shortcut menu or by positioning the insertion point on it.


Coding Convention Checking
Editor offers messages tooltip, also from Naming Convention checking functionality.

Start Other Applications from the Editor
Right-click on Editor's keyword %Start activates the external application or document defined by this command. The form of the command is %Start command_line%. Executables and files with a Windows file extension association can be activated this way.
Right-click on Editor's keyword %Edit loads a file in a new Editor window. The form of the command is %Edit filename%.
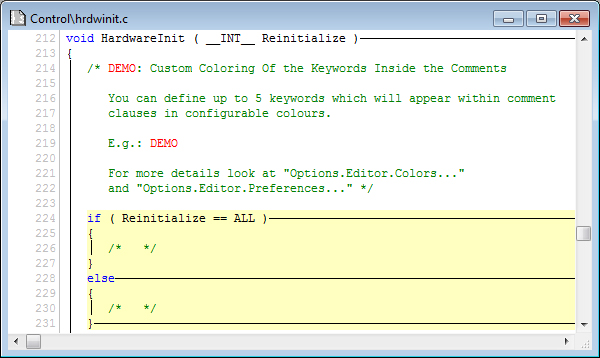
The editor provides a way of emphasizing certain words inside the C comment lines. The list of such words is defined using Options > Editor / Source / Comment Keywords, while their color is set using Options > Editor / Source / Colors & Font / Element / Comment Keywords.
